Mobile App Design Process - The Ultimate Guide

Designing an app can feel like one of the biggest challenges in the world. You need to consider multiple mobile app design principles to ensure a seamless and engaging user experience.
However, if you're not careful, you could make a colossal mistake from the beginning and wind up with a poorly designed app that is both difficult for users to navigate and fails to retain them. Even worse, a poorly designed app can lead to financial loss. One way to avoid such a disastrous scenario is by understanding the mobile app design process in-depth.
In today's article, we'll go through our step-by-step process for designing a high-quality mobile app. By following these key steps, you can create an outstanding user experience (UX) and interface that your audience will love.
What Is App Design?
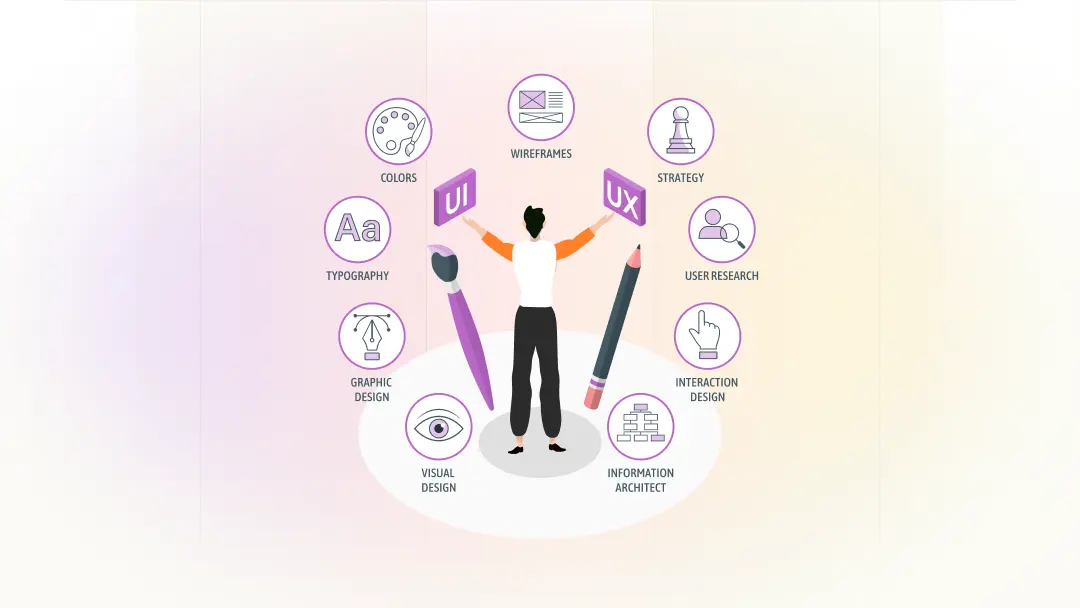
App design refers to the overall visual, interactive, and functional aspects of a mobile application. It involves two primary concepts: User Interface (UI) and User Experience (UX). A well-designed app must be aesthetically pleasing, easy to navigate, and user-friendly to leave a positive impression on users.
What Is UI in App Design?
User Interface (UI) design is the art of creating intuitive, visually engaging, and easy-to-use interfaces. It's a critical part of any mobile app development process. The UI design process includes wireframing, prototyping, and usability testing, ensuring that the final product aligns with user expectations.
Read:- How to Create a User-Friendly User Interface?
What Is UX In App Design?
User Experience (UX) design focuses on crafting a smooth, seamless, and engaging interaction between the user and the app. It involves elements such as usability, accessibility and interaction flow to enhance user satisfaction and retention.
Design An App In Just 10 Steps
A product is only as good as the problem it solves. To create a successful mobile app, it's crucial to define the app’s purpose and target audience before diving into development.
Before Starting Project Ask Yourself:
- How much time can I spend building this app?
- What essential feature am I interested in on the app?
- What kind of apps do I enjoy using?
- What do I like about these apps when used?
- How much time or money will this app save for me (as a customer)?
- How much will it improve my life & how?
Step 1: Generate an Idea

Before you start building, ensure you have a clear vision and a compelling reason behind your app. It should solve a real problem and provide unique value to users. Avoid chasing trends without validating the demand.
It would be best if you chose an idea which interests you. It is the base from which your motivation to build it will grow, as will your enjoyment in watching it progress. If you don't enjoy the building process, that will ultimately show in the final product and hinder the project from being successful over the long run.
Step 2: Research The Market

Conducting thorough market research is critical to understanding your competition and your potential user base. This step helps you identify gaps in the market and refine your app’s Unique Value Proposition (UVP).
The reactions of your early customers are the best evidence of product-market fit. If you make unique, delicious ice cream and then sell it in January, people will fleece because they remember how cold it was last January. Better to test different markets with new products that don't rely on seasonality until you've established a positive track record of customer satisfaction.
Steps 3: Create Branding for Your App

Branding plays a crucial role in app success. A strong brand identity, including logo, color scheme, typography, and tone of voice, helps make your app recognizable and builds trust with users.
Your branding is the first thing your customers will see and experience when they encounter you. For example, it provides a visual indicator of what products or services you intend to offer, who you think should be seeing them, and just how you intend to present yourself.
Step 4: Define The Features of Your App
When building anything, getting carried away can be exhausting and frustrating. You need to find the balance between adding everything that you've ever wanted and maintaining quality in the app. So that your audience is not overwhelmed with too many features being thrown at them throughout their experience, this process can easily be solved by deciding to remove certain features.
Once they have been implemented, one of these extras may only serve as an add-on to your core app rather than a requirement – and this has been possibly discovered after it was added during development. Of course, if it makes sense, then, by all means, keep them in, but otherwise, you might want to think twice before spending more time on a particular element of the project.
During this process, it's vital that you know that you are going to get negative feedback. It's inevitable. However, with the understanding that its purpose is pointless because your project is serious business and it takes a ton of time to put together, sit back and just enjoy developing an app.
When you do happen to get some criticism from someone who has no clue about what they're talking about (which will more than likely be the case), ignore them instantly and continue moving forward.
The most important part of this time will be celebrating your small victories as they come along! If a business owner understands all the work that goes into creating an app, it will certainly make them feel proud of all the hard work he or she has done during this period of time without having to worry or stress over dealing with people who simply do not understand their common goals as he or she works towards achieving success in the end.
Step 5: Make A Rough Sketch of Your App
Creating your mobile app plan can be fun. More to the point, it's highly beneficial and advantageous because you'll find yourself saving money and gaining insight into what will eventually become your app's finished design! It's truly a creative process that fosters progress but also efficiency.
We like our team (at least, in this case, we're talking about a couple at Phase Two) to draw up their plans by hand - sketches collaborating with people in one space in a notebook.

Sketch different versions of your app and consider everything that might affect the quality or design of your desired product. It's essential to be flexible, but at the same time, it's vital not to overthink things.
When you're compiling so many different ideas, the sheer number of them will be overwhelming. Still, if you narrow it down to what's manageable, then you'll have a better chance of deciding what goes into your finished product.
And speaking of what goes into your product, we suggest not getting carried away with adding too many features as it could become messy and frustrating for engineers who are trying to retrofit your work into an actual prototype that will end up shipped to your customers.
Step 6: Make a Workflow For Your Apps
One of the best ways to see things from your customer's perspective is to test a product before deciding whether it will work for your venture or not. One way to handle this problem during the early stages of product development is by signing up for free trials for your competition.
So that you can dive deep into their feature sets and functionality without spending a lot of money in the process, we know it may be tricky to get more than one competitor on board and part with some hard-earned cash.
But signing up with as many companies as possible while they are offering free trials allows entrepreneurs to have a stronger sense of how they can use these products to drive revenue forward, allowing them the chance to create something much better than what's currently available on the market.
Once you have a detailed map of how your rival's web app is set up, it becomes effortless for you to start writing down complicated workflows for your counterpart. It's all about following their business model, and also emulating their sales strategy, and choosing workflows accordingly.
Furthermore, be extra careful to pick thoughtful software development companies with extensive experience in the industry where they have proven themselves over time. Create a list of all the different kinds of delectable stories and achievements your restaurant will host.
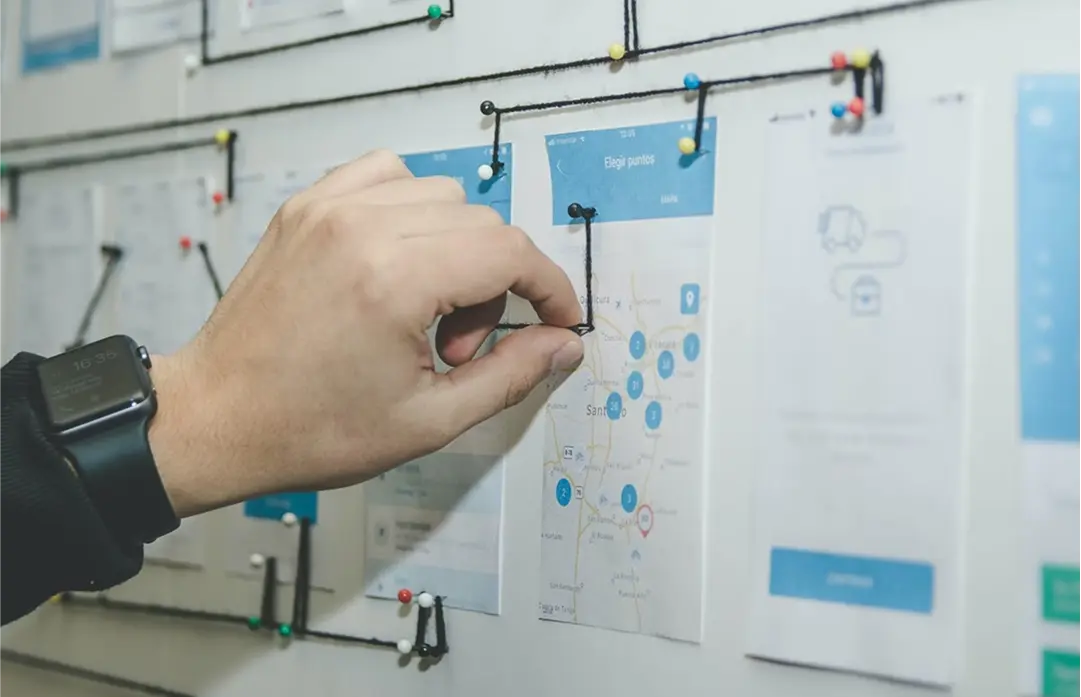
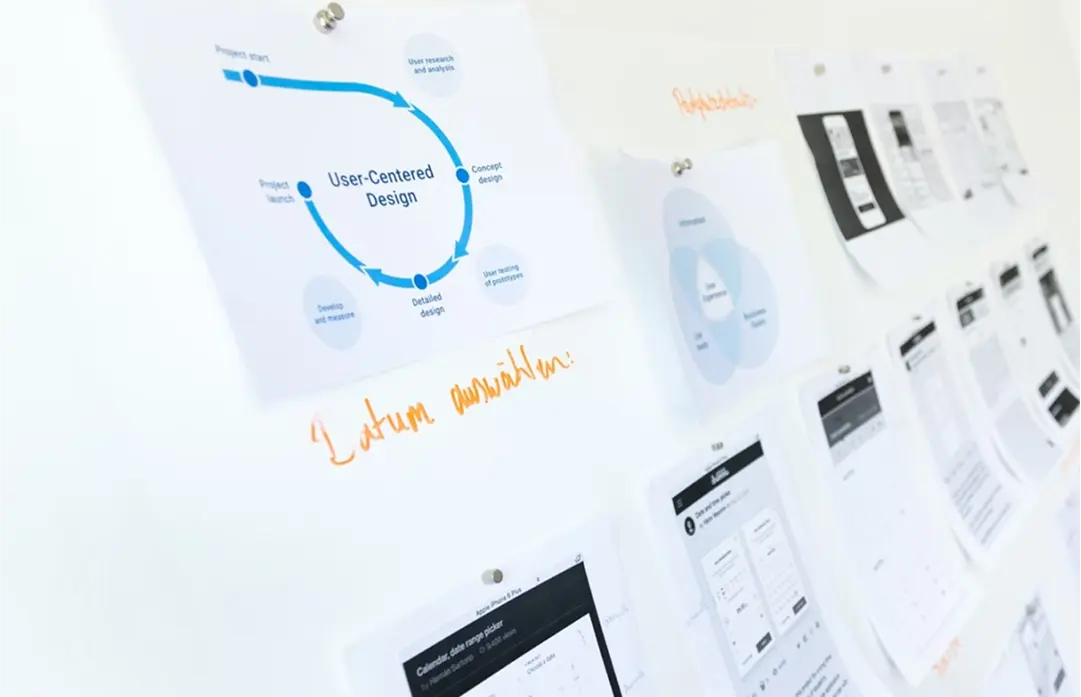
Step 7: Prototyping & Wireframing For Your App
Now, it's time to create some prototype with which potential clients can see the direction in which you would like your app project to be heading.
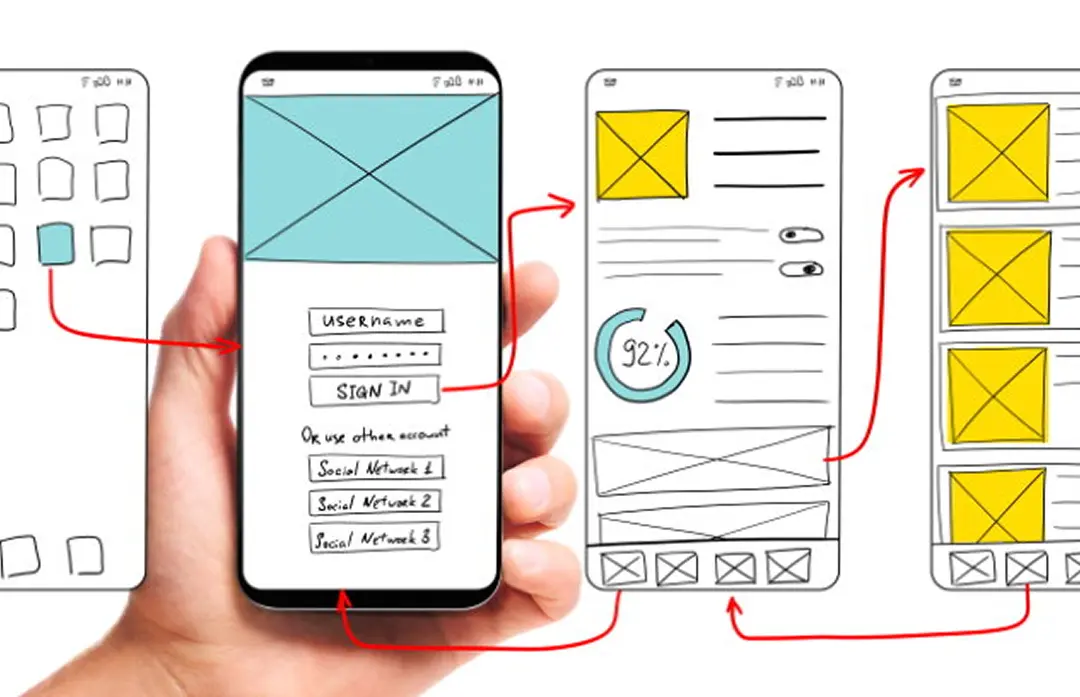
Wireframing is like designing a blueprint of your application; it's the process of determining what your product will look like from a technical standpoint. On the other hand, prototyping takes that process one step further by presenting your page as if it were interactive.
Wireframing helps create a blueprint of your app’s layout, while prototyping allows you to build interactive mockups that simulate real-world app usage. This step helps in identifying potential design flaws before development. Use prototyping tools like Adobe XD, InVision, or Figma to bring your designs to life.
Step 8: Your App's Visual Design and Presentation
When judging your product's design, one of the first things that you come to notice is that it should feel and look familiar. That's because designs have evolved over time based on what makes users feel more comfortable using apps.
In this step, you need to shift your focus to the style and appearance of the app interface. Your design team will most likely provide a few examples and concepts of how they envision it looking before your final product is built.
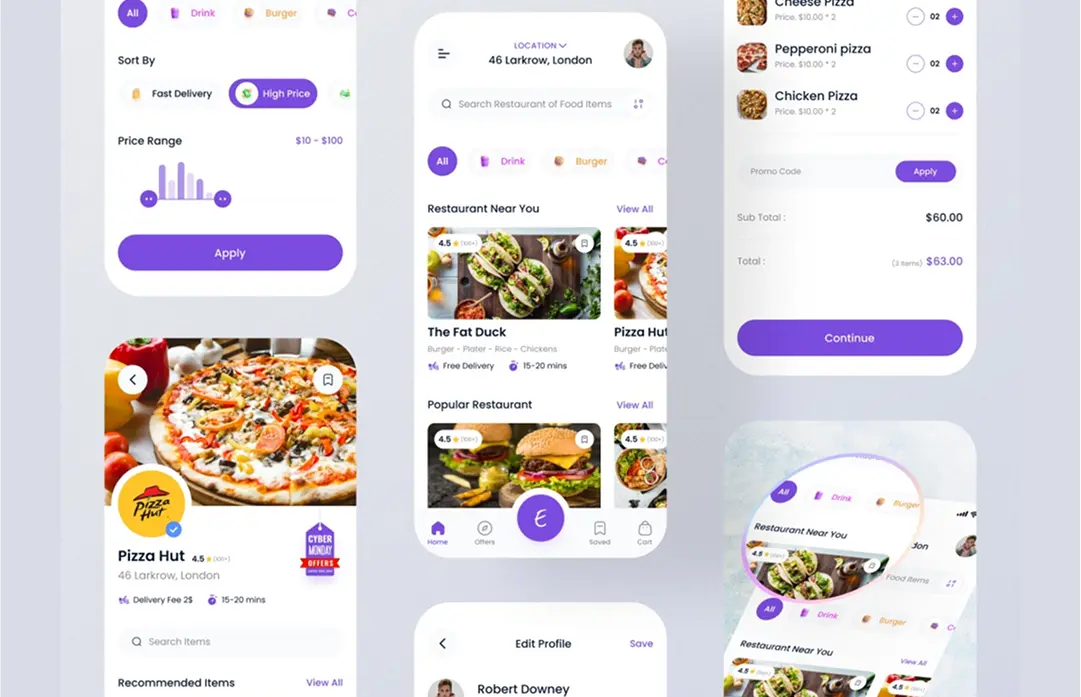
by UIHut
A designer may have a good eye for design, but they must put in the hard work. That's why they follow a process when creating mockups that are relevant to their specific client(s). The workflow begins with assembling all the required documents (which could be a rather tedious undertaking). It's important to note that the result of this aspect of the design process is high-quality products with unique interface elements.
Step 9: App Testing and Evaluation
Finally, once you've ironed out the UI/UX and functionality of the app, users can now test the actual product in a series of usability testing scenarios. This is where companies bring in actual users to test and interact with your application to ensure that it's easy to use for consumers.

It's important to ask both beginner and more advanced users for technical feedback about your product, especially when the software you offer is complicated and requires significant training. This way, you can reveal potential issues with features and functionality before they negatively impact your customer base.
Step 10: Finalize Your App
Once the app has been designed, tested, and refined, it’s time for final tweaks and launching. Consider creating app store listings with optimized descriptions, screenshots, and promotional videos to maximize visibility. Ensure compliance with App Store and Google Play guidelines for a smooth approval process.
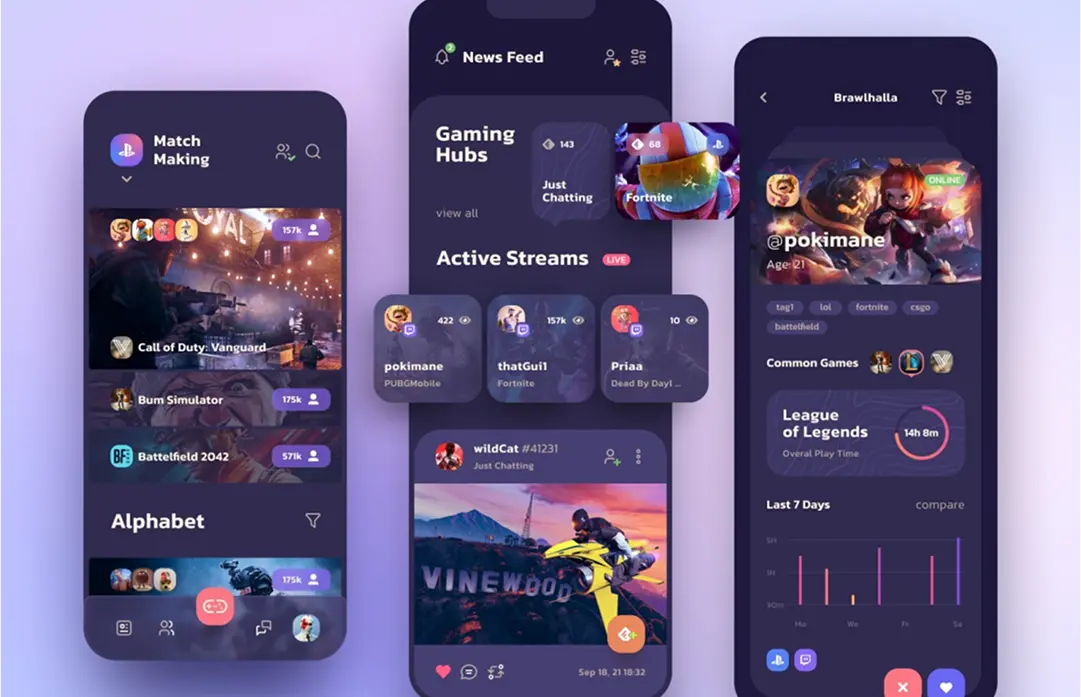
by uixNinja
It makes your clients extremely happy. Or, if you are doing any personal project, you can make some incredible presentations to showcase on your personal portfolio like Dribbble, Behance, etc.
Conclusions
There are many reasons to develop a mobile app, whether it’s to launch a startup, grow a business, or generate additional income. However, without a structured mobile app design process, even great ideas can fail. By following the 10-step app design guide outlined above, you can create a successful, user-friendly, and engaging app that stands out in a competitive market. For more leanings and updates, stay tuned to us.